Everyone mails holiday cards but who mails Halloween cards? I do.... I love snail mail- I wish I had a friend that mailed me snail mail. I made cards last year that said "The thought of not knowing you scares me" with an added personalized message.
Any excuse to send mail I will!
Celebrating love.
Tuesday, November 20, 2012
My parents recently celebrated their 30th wedding anniversary. For a little surprise I made this sign for my parents to see (when they wake up at 5am, mind you). It was hit. It brought big smiles to their faces and I'm sure it was nice to witness other people celebrating their successful marriage. I downloaded the font from dafont.com and printed the letters on card stock. I punched holes on each of the top corners and strung string through the front of the holes. And voila! Something simple, but touching.
DIT&O!
-Christina
@city_loveee
Designlovefest Love
Tuesday, November 6, 2012
Have you seen designlovefest.com? It's amazing! They have so many beautiful DIYs that you must check out. I plan on making many of their DIYs very soon. These are my top 4 favorites. Which ones are your favorites?
DIT&O!
-Christina
@city_loveee
Free To Do List Printable
Friday, November 2, 2012
EDIT: November 2013 - Thank you for visiting our blog! Please feel free to click around. Thank you your interest!
Hey Everyone,
Hey Everyone,
As of this week, I have been making a ton of to-do lists. I love having to-do lists because it's such an accomplishment when you have checked off tasks that you've completed. I decided to whip up this simple to-do list printable, so I can stop making to-do lists on my class notes. I limited the number of lines, so you don't overwhelm yourself, ya feel me? I wanted to share it all with you, so feel free to download a copy yourself!
Download here.
DIT&O!
-Christina
city_loveee
A whale of a tale!
Wednesday, May 23, 2012
EDIT: November 2013 - Thank you for visiting our blog! Please feel free to click around. Thank you your interest!
Hey Fellow DIT&Oers!
I just wanted to share a DIY with you all. Recently, I made a plush whale out of old denim as a birthday gift for my sister, Ashley. Whales have become one of her favorite animals because of an inside joke that her and I share so I thought it would be perfect. I used this pattern. I highly recommend it!
Let me know what you think!
DIT&O!
-Christina
@city_loveee
[Photos by Ashley Richards]
[Photos by Ashley Richards]
Apartment: Moving Announcements
Friday, April 20, 2012
Finally moved out with John! It's almost been 8 years [in November] and we finally did it.
I love sending and receiving mail so what better opportunity than moving announcements. I searched for inspiration on Martha Stewart and Paper Source. My original idea was just to print a map of the area with a dot to mark our new home.
After looking at my inventory of stationary I chose a stationary set that I hadn't used much of. So instead of printing a map from google maps, I imported the map into photoshop and traced the major streets. It didn't take too long, probably 15 mintues total. I printed my clip art map onto the stationary sheets (to do this all you have to do is modify the paper size and print like normal). I put a small shipping label that read "We've moved!" on the map and left space for writing. I also printed address labels.
Because I love getting mail so I inclueded an envelope alreay stamped and addressed to John and I so our recipients could write us back.
I sent most of the cards last week and have already gotten 3 cards. I was SO excited to check the mail and of course the first card I got was from Christina! I got a card from John's niece and her last sentence was "are we pen pals now?", YES Genna, we are! :)
 |
| I thought it was weird to have my address posted everywhere so I blurred it out. |
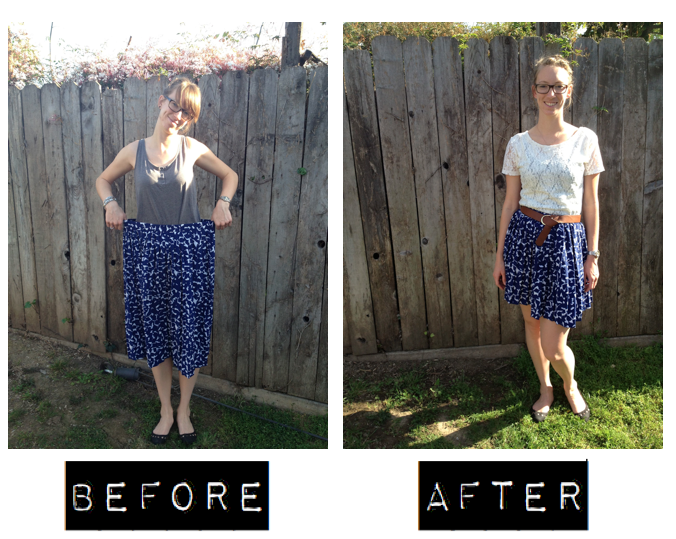
A skirt reborn.
Thursday, April 12, 2012
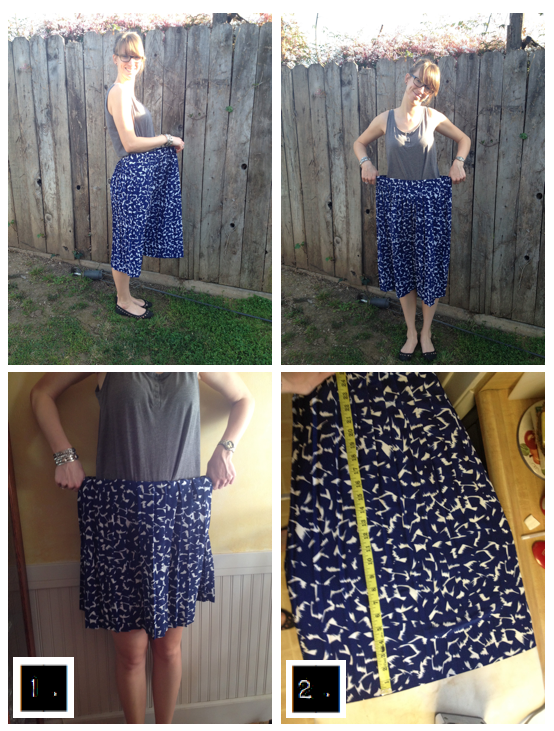
This is really useful DIY for all of you thrifters out there! I got this skirt out thrifting and the elastic waistband was completely shot, but the fabric was so cute! So what I decided to do was replace the elastic band and and also raise the hem in the process.
1. First you role the waistband up to the desired length.
2. Measure the desired length.
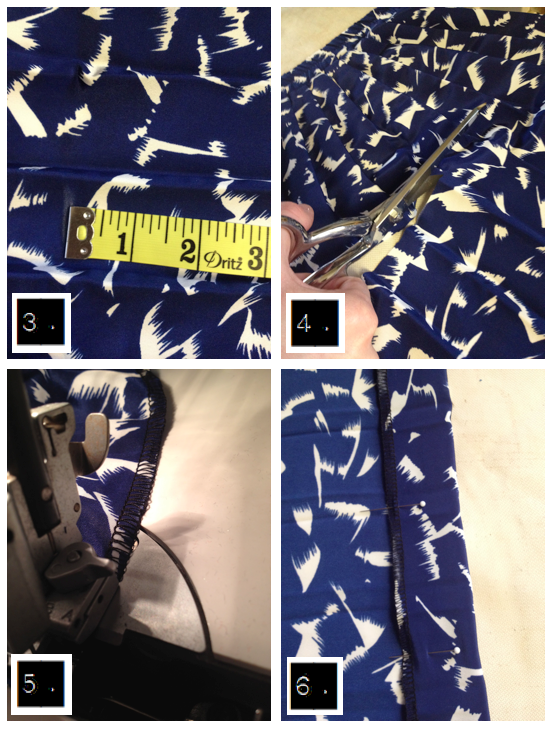
3. Mark the length all around the skirt.
4. Cut off the top of the skirt.
5. Serge the cut edges.
6. Fold over the top to create the casing for the elastic. (make sure there’s ease so the elastic fits in)
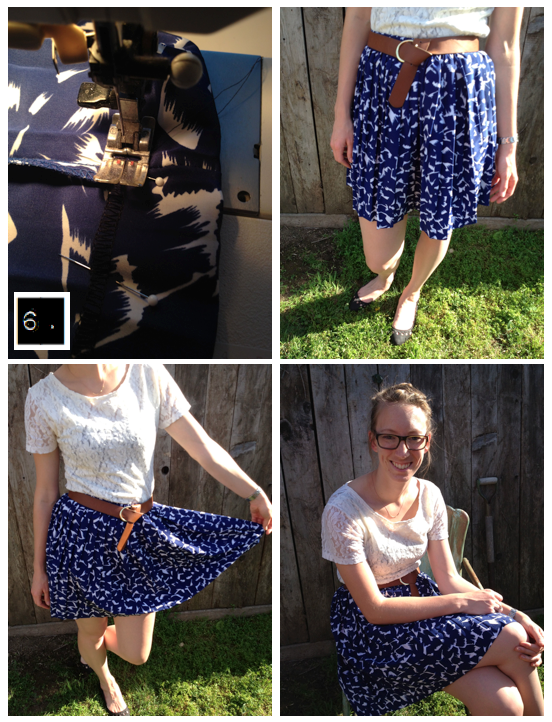
7. Put the elastic in and sew it up!
& there you have it! A brand new skirt! Let me know if you have any questions, and let me know what you think!
DIT&O!
-Christina
DIT&O Crafternoon
Tuesday, April 10, 2012
On January 28, over 15 creative ladies joined us at our crafternoon. We sent invites and reminders through RedStamp. There were a couple of DIYs that we did for the party (and they will have their own post). We learned a lot from the first DIT&O party: start earlier, have an end time, manage time while crafting and have all supplies ready. We did 4 crafts: twig candle holder, ruffle shoe clips, hexnut bracelets and Valentine's day cards. The hexnut bracelets were repeated because at our first party only two people made them.
The giveaway this time around was a folder with some goodies in it. There was a printed sheet with the list and links to the crafts we made, a custom made DIT&O notepad and a round magnet.
 |
| Sign in table |
 |
| Instagram picture (Thanks Ashley!) |
 |
| Making the twig candle holders. |
 |
| Crafting away making cards, while I oversee. haha. |
 |
| Christina and Karissa. I love this picture! |
 |
| Twigs for candle holders. |
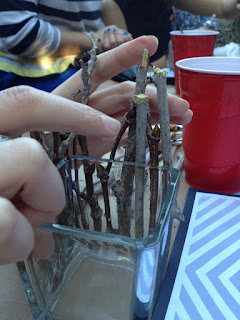 |
| Working hard to keep the twigs together. |
 |
| Heart streamers. |
 |
| View of the backyard. |
 |
| Bar area with snacks and drinks. |
 |
| Choosing fabric for the ruffle shoe clips. |
| Karissa and Mena |
| Julia (Karissa's mom) and Aubrey |
 |
| Angel, Karissa and Ashley |
We had a ton of fun and were glad everyone who came could make it. They will only get better and better!
1st Giveaway
Friday, April 6, 2012
Hey Everyone!
Sorry for the lack of posts, we've missed you and are excited to back!
We reached our 50th follower, and we're prepared for the giveaway! I know you guys have been waiting with bated breath. We apologize for the wait, but we assure you this was worth the wait! Instead of there being ONE winner, there will be one grand prize of the cowl, bracelet and necklace for one person. And 4 more winners who will win a bracelet or necklace.
The grand prize winner is Rose!
The runner ups are Molly Snow, Meg Reed, Alyce Ayers, Create Fabulous!
So please email your mailing address to hello.dito@gmail.com!
-DIT&O
Chevron Necklace Tutorial
Friday, January 13, 2012
I saw this great necklace on Pinterest and after a few clicks saw that it wasn't a DIY as I thought it was. So when I pinned it, I captioned it "not a DIY, but I'd like to make it one". So HERE it is!!!!!!! I had never made jewelry before, so if you haven't either you can do this! I promise you. The only thing I had to practice was making loops with the round nose pliers. I also didn't own a lot of the materials but they're inexpensive at craft stores.
Materials can easily be purchased at Michael's or any jewelry supply shop.
First thing, the 1 eye pin you have is to hold all of the strands of beads so start with one white bead and I put a small binder clip at the end just to hold it all together. I have a kitten, Buzz, and he for some reason kept wanting to play with the beads.
On the first head pin you will put 6 red beads, 2 turquoise beads and 4 pink beads. This will be repeated on all 11 head pins.
You will need to cut each head pin to size and make a loop so it can hang on the eye pin. To do this, use your wire cutters and cut about 1cm above the beads. You'll notice that the round nose pliers are tapered, on one end they are thicker and then become thinner on the opposite end. Depending on the size loop you want to make will determine the area of the pliers you use. For this project you will definitely use the thinner end. With the round nose pliers at the top of the head pin, begin turning the pliers around forming a loop. This will take a little practice but is not difficult. I suggest practice making loops with the round nose pliers if you never have, on another head pin.
Your first strand is done and can be places on your eye pin followed by a white bead and placed aside.
Continue making each strand. The only thing that changes from strand to strand is the number of white beads. And you'll notice it will not follow the diagram perfectly. This is because beads range in sizes, some of them are longer than others and some are shorter than others. To compensate for this you will need to hold your strand to the completed strands before cutting it. You need to make sure that it is longer than the previous strands. On the picture below, (on the right) you will see that before cutting that head pin I checked to see if it's long enough before cutting.
 |
| 2 strands are complete, 9 more to go. |
 |
| Check length of strand before cutting. |
Continue making the rest of your strands. The necklace is symmetrical so strand 1 is identical to strand 11 and so on. You want to also make sure that the identical strands match in length.
 |
| Cut you chain to length. This really is personal, if you prefer longer or shorter. I cut mine to 22 inches. |
Next you need to close the other end of your eye pin. You will do this like the other head pins with the round nose pliers. Give yourself a little more than 1 cm of wire to make the loop and you want to make the loop in the same direction as the other pre-made loop, I put both of mine facing down.
Before closing your loop put one end of your cut chain and then close it.
On the other pre-made loop, open the loop slightly and place the other end of the chain.
Cut your chain at the middle where the clasp will go.
At the end of your chain you can add small jump rings to make the length of your necklace adjustable, or if you don't need it to be, you can just add one jump ring. On the other end place one jump ring and the lobster.
And you're done!!!!!!!
Wear your necklace and surprise people when you say you made it!
If you have any questions of if I didn't make something clear enough please let me know.
DIT&O
-Karissa
Subscribe to:
Posts (Atom)


